BioPRYN Testing
How does this work?
There are three steps for sample collection and testing.
- Obtain BioPryn testing supplies from the BioPryn website.
- Collect Samples.
- Prepare and ship samples for testing to Tennessee Livestock Testing.

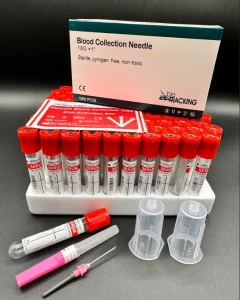
Obtaining BioPRYN Testing Supplies
You may obtain BioPRYN testing supplies either directly from Gordonsville Veterinary Clinic or from the BioPRYN store at https://www.biotrackingstore.com
When purchasing online, please select options that include RED top tubes. For 10% off your order, use coupon code: TNLT
Collect Samples
There are separate collection procedures depending on the animal that is being tested – Cattle (Beef/Dairy) or Small Ruminants.
We will describe these individually here:

Visual Instructions for Cattle sample collection.
Cattle – Sample Collection
- Use a fresh bleeding needle with every cow. Cross-contamination of blood will affect the results.
- Screw the Vacutainer needle onto the needle holder.
- Insert the Vacutainer tube into the other end of the needle holder until the stopper touches the back portion of the needle. Do not puncture the stopper. Hold these assembled materials in one hand.
- Lift the cow’s tail with the other hand.
- Insert the needle about 1/2 inch deep and perpendicular to the tail at the underside, midline and at about 3 to 6 inches from the base of the tail. In this region, there is a longitudinal, midline ridge of skin through which you push the needle.
- Blood will appear at the junction of the stopper and the back portion of the needle once the vein is punctured. If it does not appear, pull the needle out slightly and insert in a different direction until the vein is punctured.
- Once blood is seen, push the tube onto the back portion of needle creating a vacuum. Be sure to keep the bleeding portion of the needle under the skin as the vacuum will pull blood into the tube and if suction is lost, blood cannot be collected. Use a new tube if this happens.
- Collect 2cc or more of blood. Samples less than 2cc cannot be used for testing.
- Withdraw the needle from the skin, remove tube from holder, unscrew the Vacutainer needle from the needle holder, and discard the needle into a “sharps” container. Needle holders can be reused.
- Sequentially and LEGIBLY label the sample vials with the ear tag ID using a permanent marker on the vial label, NOT the rubber stopper. These IDs should also be reflected on the submission sheet.
- Place the tube(s) in a refrigerator until ready for shipment.
- Completely fill out the BioPRYN Pregnancy Test Form (here). Please be certain that the total number of samples sent is correct, IDs match tube numbers, and payment is included.
- Send samples (wrapped in absorbent material in a plastic bag) and submission form in a box to the laboratory following shipping instructions.
- Tennessee Livestock Testing will process all samples received in a weekly batch, and results will be reported via email.
* Don’t forget to recheck cows that tested “pregnant” at 28 days again between 70 and 80 days as a certain percentage will experience early embryonic death loss. Confirmation pregnancy checks are very important for this reason.
Click Here to download this information in a pdf file for printing.
Click Here to download this information in a Word file for printing.
- Use electric shears to shave a patch of hair/wool approximately 4″ wide x 8″ long from the animal’s neck to visualize the jugular vein. Shaving allows for easier viewing of the vein and provides a clean area to help prevent infection.
- Note: Blood sampling can be done with assistance or alone; however, producers who are new at blood sampling will benefit from having assistance.
- The assistant should turn the head of the animal at a 30-degree angle to the side by holding the animal under its jaw to allow for easy access to the vein. The animal’s body may also need to be restrained; another assistant or a blocking stand can help keep the animal from moving.
- Restraining an animal without assistance is better for those who have become proficient at drawing blood. The handler should straddle the animal, place his or her knees behind the animal’s shoulders, and back the animal into a corner or against a wall to help control her hindquarters.
- The animal’s head should be turned opposite to the side of collection, once again at a 30-degree angle. Restraint of the head is accomplished by using the elbow and the upper arm to keep it held off to the side. This leaves both hands available for the blood collection. An unruly animal can be dangerous to the assistants, the person drawing the blood, and to itself. It is important to be gentle and patient when restraining the animal.
- The easiest way to locate the jugular vein is to draw an imaginary line from the middle of the animal’s eye down the side of her neck. Then apply pressure with your thumb or fingers in the groove on either side of the trachea and below the half-way point of the shaved area. This should cause the vein to pop up and be easy to see.
- Once the vein has been located, the area needs to be properly cleaned to keep bacteria out of the needle insertion site. This is accomplished using surgical scrub on the area – apply a small amount to a few pieces of gauze. Squeeze excess scrub out of the gauze, start in the center, and work your way out toward the edge. Never go back over a place that has already been wiped, which may allow bacteria to be carried back into the disinfected area.
- Once the area has been cleaned and the vein has been located, the blood can be drawn. This can be done using a needle, needle holder, and a blood collection tube. Remember to use a fresh bleeding needle with every animal; cross-contamination of blood will affect the results.
- Screw the Vacutainer needle onto the needle holder if not already prepared.
- Insert the Vacutainer tube into the other end of the needle holder until the stopper touches the back portion of the needle. Do not puncture the stopper yet. Hold these assembled materials in one hand.
- The needle holder should be guided into place with the right hand while the left hand is used to apply pressure to the vein. The vein should be easy to see and feel – aim for the center to improve accuracy. Inserting the needle does not require great force; apply just enough pressure to break through the skin and enter into the jugular vein.
- Blood will appear at the junction of the stopper and the back portion of the needle once the vein is punctured. If it does not appear, gently withdraw the needle so that the tip comes to the outside of the wall of the vein and re-insert.
- Once blood is seen, push the tube onto the back portion of needle creating a vacuum. If the needle is in the vein, blood will start to fill the container immediately. Be sure to keep the needle under the skin as the vacuum will pull blood into the tube and if suction is lost, blood cannot be collected. Use a new tube if this happens.
- Collect 2cc or more of blood. Samples less than 2cc cannot be used for testing.
- Before removing the needle, the handler should be sure to remove pressure from their left hand to prevent forcing blood out of the insertion site. Gently remove needle. Press fingertip over the insertion site for a few seconds to promote clotting. A small red dot may be visible once process is completed. This is normal and not of concern.
- Remove tube from holder, unscrew the Vacutainer needle from the needle holder, and discard the needle into a “sharps” container. Needle holders can be reused.
- Sequentially and LEGIBLY label the sample vials with the ear tag ID using a permanent marker on the vial label, NOT the rubber stopper. These IDs should also be reflected on the submission sheet.
- Place the tube(s) in a refrigerator until ready for shipment.
- Completely fill out the BioPRYN Pregnancy Test Form (here). Please be certain that the total number of samples sent is correct, IDs match tube numbers, and payment is included.
- Send samples (wrapped in absorbent material in a plastic bag) and submission form in a box to the laboratory following shipping instructions.
- Tennessee Livestock Testing will process samples received in a weekly batch, and results will be reported via email.
SHIPPING
Samples can be shipped using the United States Postal Service (USPS), FedEx, or United Parcel Service (UPS). Please see the specific instructions to the right for how to ship samples using these services.
What to Ship
Samples
- Bundle tubes together in groups of 2-10 tubes with a rubber band.
- Wrap the bundle with newspaper or paper towels (enough to absorb all fluid if all tubes break).
- Place inside a leak proof zip lock bag or baggie.
- Pack the bags with bubble wrap or absorbent newspaper inside a cardboard box.
- DO NOT SHIP SAMPLES IN PLAIN OR PADDED ENVELOPES!
- Sample Submission Form
*IMPORTANT: Be sure to include a Sample Submission Form in your shipment. Samples received without a completed submission form will not be processed.
The submission forms can be downloaded HERE.
How to Ship
USPS
- Print and place a Biohazard symbol inside of the box.
- Or write Biohazard on the plastic bag or on a note size piece of paper with a sharpie.
- DO NOT PUT BIOHAZARD ON THE OUTSIDE OF THE BOX!
- Write “Exempt Animal Specimen” on the outside of the box.
- If you have questions, please consult with your local post office and/or check the USPS website.
FedEx
- Write “Exempt Animal Specimen” on the outside of the box.
- If you have questions please consult with your local FedEx store and/or check the information on the FedEx website.
UPS
- Write “Exempt Animal Specimen” on the outside of the box.
- If you have questions please consult with your local UPS store and/or check the information on the UPS website.
Where to Ship
Tennessee Livestock Testing
507 Gordonsville Hwy
Suite #203
Gordonsville, TN 38563
507 Gordonsville Hwy. Ste. 203 Gordonsville, TN 38563
tennesseelivestocktesting@gmail.com